Golden Text  

Posted by Kostas in

We will be creating this:

Make a new document, I've chosen 400X200 PX's.

2.Type your : (I've used Wavy font at 115 Pt's)


Time for the layer styles
3. Now go Layer -> Layer Style -> Drop Shadow:


4.Bevel and Emboss:


5. Gradient Overlay:


6. Stroke: (The gradient is the same we chose in Gradient Overlay: "Copper")


Now we should have this:
Now it's time to give it a golden color;
7. Layer -> New Adjustment Layer->Hue/Saturation (name it as you want)


Done!

Bling Bling Text  

Posted by Kostas in

We will be crating this:


1.Create new document make it 500X200, Black as your Background, White as Foreground.
2.Type your text (I used AuntBertha font at 170 Pt)


3.Ctrl click on the text layer in order to bring your text's selection
4. Without deselecting, create a new layer above your text layer and name it Golden text.


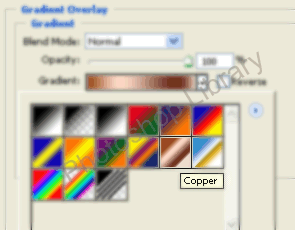
5. Select the Gradient Tool (G) than press D (to rest foreground\background colors to default), and make a gradient like this: (begin at the top of your text & go down)


6.Deselect (Ctrl+D). Filters -> Render -> Lighting Effect and use these settings:
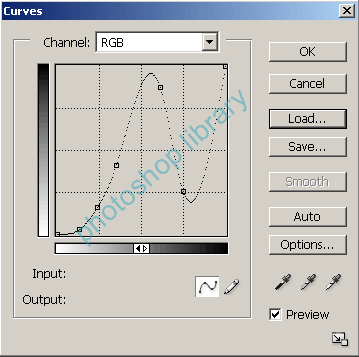


7. Image -> Curves


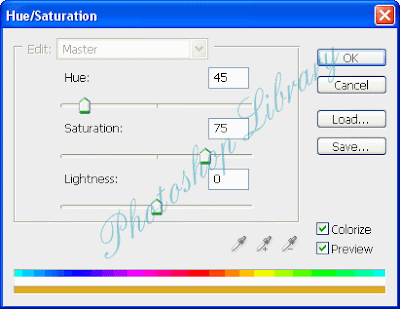
8. Now we shall give the text a proper color, go Image -> Adj's -> Hue\Saturation (Ctrl+U) and enter the following settings:


9. Now we are done with the golden text and it is time for the diamonds.
Create new layer call it diamonds next step is going Select -> Modify -> Contract (now, the size depend on font size etc...play with it)
I used 5 Px.
10.Fill the selection with White,deselect and go to Filter -> Noise -> Add Noise


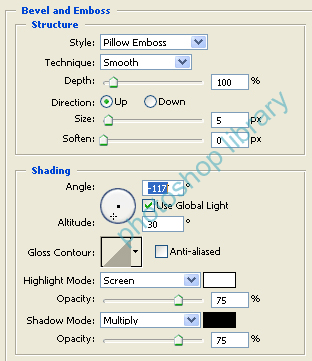
11. Layer Style -> Bevel & Emboss:


12. We're almost done – time for the final touch. Select your Brush Tool (B) and choose "Assorted Brushes". Roll until you'll see brush number 50:


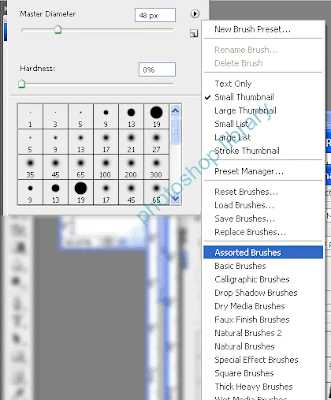
13. Select brush number 50:


14.Create a new layer, and make sure your foreground color is White. Now with your brush click on the spots you want to "bling";

Neon Text  

Posted by Kostas in

End Result:


1.Open a new document with Black background.

2.Type your text, you should choose a thin font such as Bickley script.
and give it a White color.


3.Duplicate your text layer (Left click on the text layer -> Duplicate Layer),
and than Select->Load Selection, a window will open – click OK.


4. Left click on the layer & select "Rasterize Layer" or Layer-> Rasterize ->Type

5.While your selection is still active , go to Filter -> Blur -> Gaussian Blur, enter 2.2 as Radius and hit OK, don't deselect!

6. With the duplicated layer still active, Go to Edit -> Stroke and
use these settings, the stroke width may very because of your font size.


7.Deselect (Ctrl+D) and make sure the original text layer is select: Layer -> Layer Style -> Outer Glow. Use the following settings:


8.Now drag your original text layer (not the duplicated one)
in the layers palette to the top and change its blending
mode from Normal to Overlay, you should have something
like this:


*Note, you can use any color you want for the text, just make sure the stroke text and Outer Glow text are close colors. (For example, my two shades of Blue)


Posted by Kostas


The first PL (Photoshop Library) post was lunched!